Intro to Git & GitHub
Overview
Teaching: 90 min
Exercises: 30 minQuestions
What is version control and why should I use it?
How do I get set up to use Git?
How do I share my changes with others on the web?
How can I use version control to collaborate with other people?
Objectives
Explain what version control is and why it’s useful.
Configure
gitthe first time it is used on a computer.Learn the basic git workflow.
Push, pull, or clone a remote repository.
Describe the basic collaborative workflow with GitHub.
Contents
- Background
- Setting up git
- Creating a Repository
- Managing versions and tracking changes
- Versioning multiple files
- Intro to GitHub
- Collaborating with GitHub
- BONUS
- Glossary of terms
Background
We’ll start by exploring how version control can be used to keep track of what one person did and when. Even if you aren’t collaborating with other people, automated version control is much better than this situation:
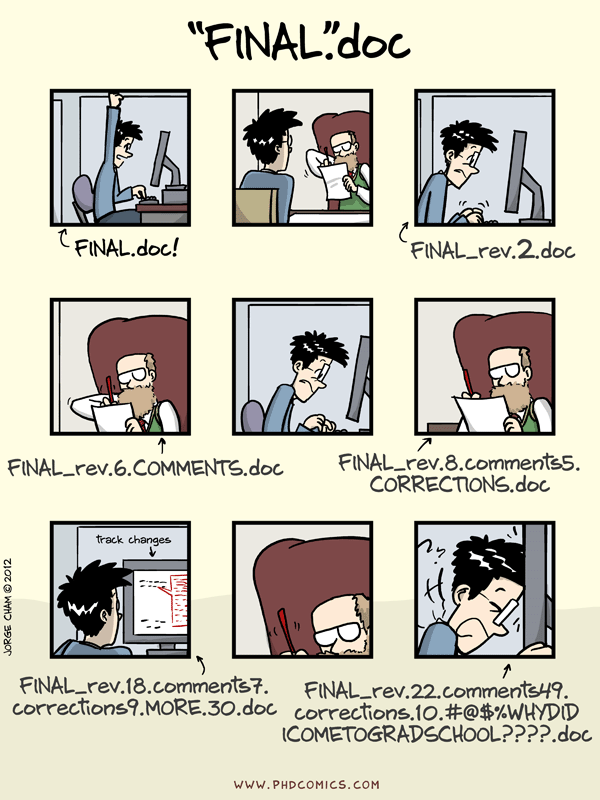
“Piled Higher and Deeper” by Jorge Cham, http://www.phdcomics.com
We’ve all been in this situation before: it seems ridiculous to have multiple nearly-identical versions of the same document. Some word processors let us deal with this a little better, such as Microsoft Word’s Track Changes, Google Docs’ version history, or LibreOffice’s Recording and Displaying Changes.
Version control systems start with a base version of the document and then record changes you make each step of the way. You can think of it as a recording of your progress: you can rewind to start at the base document and play back each change you made, eventually arriving at your more recent version.

Once you think of changes as separate from the document itself, you can then think about “playing back” different sets of changes on the base document, ultimately resulting in different versions of that document. For example, two users can make independent sets of changes on the same document.

Unless multiple users make changes to the same section of the document - a conflict - you can incorporate two sets of changes into the same base document.

A version control system is a tool that keeps track of these changes for us, effectively creating different versions of our files. It allows us to decide which changes will be made to the next version (each record of these changes is called a commit), and keeps useful metadata about them. The complete history of commits for a particular project and their metadata make up a repository. Repositories can be kept in sync across different computers, facilitating collaboration among different people.
Paper Writing
Imagine you drafted an excellent paragraph for a paper you are writing, but later ruin it. How would you retrieve the -excellent- version of your conclusion? Is it even possible?
Imagine you have 5 co-authors. How would you manage the changes and comments they make to your paper? If you use LibreOffice Writer or Microsoft Word, what happens if you accept changes made using the
Track Changesoption? Do you have a history of those changes?Solution
Recovering the excellent version is only possible if you created a copy of the old version of the paper. The danger of losing good versions often leads to the problematic workflow illustrated in the PhD Comics cartoon at the top of this page.
Collaborative writing with traditional word processors is cumbersome. Either every collaborator has to work on a document sequentially (slowing down the process of writing), or you have to send out a version to all collaborators and manually merge their comments into your document. The ‘track changes’ or ‘record changes’ option can highlight changes for you and simplifies merging, but as soon as you accept changes you will lose their history. You will then no longer know who suggested that change, why it was suggested, or when it was merged into the rest of the document. Even online word processors like Google Docs or Microsoft Office Online do not fully resolve these problems.
Setting up Git
When we use Git on a new computer for the first time, we need to configure a few things. Below are a few examples of configurations we will set as we get started with Git:
- our name and email address,
- what our preferred text editor is,
- and that we want to use these settings globally (i.e. for every project).
On a command line, Git commands are written as git verb options,
where verb is what we actually want to do and options is additional optional information which may be needed for the verb. So here is how
Riley sets up their new laptop:
git config --global user.name "Riley Shor"
git config --global user.email "Riley.Shor@fake.email.address"
Please use your own name and email address instead of Riley’s. This user name and email will be associated with your subsequent Git activity, which means that any changes pushed to GitHub, BitBucket, GitLab or another Git host server in a later lesson will include this information.
For these lessons, we will be interacting with GitHub and so the email address used should be the same as the one used when setting up your GitHub account. If you are concerned about privacy, please review GitHub’s instructions for keeping your email address private.
GitHub, GitLab, & BitBucket
GitHub, GitLab, & BitBucket are websites where you can store your git repositories, share them with the world, and collaborate with others. You can think of them like email applications. You may have a gmail address, and you can choose to manage your email through one of many services such as the Gmail app, Microsoft Outlook, Apple’s Mail app, etc. They have different interfaces and features, but all of them allow you to manage your email. Similarly, GitHub, GitLab, & BitBucket have different interfaces and features, but they all allow you to store, share, and collaborate with others on your git repos.
Line Endings
As with other keys, when you hit Return on your keyboard, your computer encodes this input as a character. Different operating systems use different character(s) to represent the end of a line. (You may also hear these referred to as newlines or line breaks.) Because Git uses these characters to compare files, it may cause unexpected issues when editing a file on different machines. Though it is beyond the scope of this lesson, you can read more about this issue in the Pro Git book.
You can change the way Git recognizes and encodes line endings using the
core.autocrlfcommand togit config. The following settings are recommended:On macOS and Linux:
git config --global core.autocrlf inputAnd on Windows:
git config --global core.autocrlf true
This optional setting will make a downstream step with GitHub a bit clearer.
git config --global init.defaultBranch main
Riley also has to set their favorite text editor, nano.
git config --global core.editor "nano -w"
Git can be configured to support most text editors. You can reconfigure the text editor for Git whenever you want to change it.
| Editor | Configuration command |
|---|---|
| Atom | $ git config --global core.editor "atom --wait" |
| nano | $ git config --global core.editor "nano -w" |
| BBEdit (Mac, with command line tools) | $ git config --global core.editor "bbedit -w" |
| Sublime Text (Mac) | $ git config --global core.editor "/Applications/Sublime\ Text.app/Contents/SharedSupport/bin/subl -n -w" |
| Sublime Text (Win, 32-bit install) | $ git config --global core.editor "'c:/program files (x86)/sublime text 3/sublime_text.exe' -w" |
| Sublime Text (Win, 64-bit install) | $ git config --global core.editor "'c:/program files/sublime text 3/sublime_text.exe' -w" |
| Notepad (Win) | $ git config --global core.editor "c:/Windows/System32/notepad.exe" |
| Notepad++ (Win, 32-bit install) | $ git config --global core.editor "'c:/program files (x86)/Notepad++/notepad++.exe' -multiInst -notabbar -nosession -noPlugin" |
| Notepad++ (Win, 64-bit install) | $ git config --global core.editor "'c:/program files/Notepad++/notepad++.exe' -multiInst -notabbar -nosession -noPlugin" |
| Kate (Linux) | $ git config --global core.editor "kate" |
| Gedit (Linux) | $ git config --global core.editor "gedit --wait --new-window" |
| Scratch (Linux) | $ git config --global core.editor "scratch-text-editor" |
| Emacs | $ git config --global core.editor "emacs" |
| Vim | $ git config --global core.editor "vim" |
| VS Code | $ git config --global core.editor "code --wait" |
Vim is the default editor. If did not change your editor and stuck in this editor, the following instructions will help you exit.
Exiting Vim
Note that Vim is the default editor for many programs. If you haven’t used Vim before and wish to exit a session without saving your changes, press Esc then type
:q!and hit Return. If you want to save your changes and quit, press Esc then type:wqand hit Return.
The four commands we just ran above only need to be run once: the flag --global tells Git
to use the settings for every project, in your user account, on this computer.
You can check your global settings at any time:
git config --global --list
You can change your configuration as many times as you want: use the same commands to choose another editor or update your email address.
Proxy
In some networks you need to use a proxy. If this is the case, you may also need to tell Git about the proxy:
git config --global http.proxy proxy-url
git config --global https.proxy proxy-url
To disable the proxy, use
git config --global --unset http.proxy
git config --global --unset https.proxy
Git Help and Manual
Always remember that if you forget a
gitcommand, you can access the list of commands by using-hand access the Git manual by using--help:git config -h git config --helpWhile viewing the manual, remember the
:is a prompt waiting for commands and you can press Q to exit the manual.
Creating a Repository
Once Git is configured, we can start using it. We’ll start with a simple example
to explore a few of the most important and common git commands. For this example,
we will create a new project directory called cheatsheets inside our home
directory:
cd # cd by itself changes to the home directory
mkdir cheatsheets
cd cheatsheets
pwd
/home/USERNAME/Desktop/cheatsheets
Let’s create a file called bash-cheatsheet.txt. We’ll write some notes about
a few bash commands we learned so far. We’ll use
nano to edit the file (but you can use whatever text editor you like).
nano bash-cheatsheet.txt
Type the text below into the bash-cheatsheet.txt file:
Bash cheatsheet
SWC-Workshop
Let’s first verify that the file was properly created by running the list command (ls):
ls
bash-cheatsheet.txt
Now we tell Git to make the cheatsheets into a repository
– a place where Git can store versions of our files:
git init
Initialized empty Git repository in /Users/USERNAME/Desktop/cheatsheets/.git/
It is important to note that git init will create a repository that
includes subdirectories and their files—there is no need to create
separate repositories nested within the cheatsheets repository, whether
subdirectories are present from the beginning or added later. Also, note
that the creation of the cheatsheets directory and its initialization as a
repository are completely separate processes.
If we use ls to show the directory’s contents,
it appears that nothing has changed:
ls
But if we add the -a flag to show everything,
we can see that Git has created a hidden directory within cheatsheets called .git:
ls -a -F
./ ../ .git/ bash-cheatsheet.txt
Git uses this special subdirectory to store all the information about the project,
including all files and sub-directories located within the project’s directory.
If we ever delete the .git subdirectory,
we will lose the project’s history.
We can check that everything is set up correctly by asking Git to tell us the status of our project:
git status
On branch main

No commits yet

Untracked files:
  (use "git add <file>..." to include in what will be committed)
  bash-cheatsheet.txt

nothing added to commit but untracked files present (use "git add" to track)
(If you are using a different version of git, the exact
wording of the output might be slightly different.)
Note that Git lists our file bash-cheatsheet.txt in the Untracked files
section. This is Git’s way of saying that it sees a file in the directory that
is not yet part of the repository. We use a separate command to tell git to add
files to the repository.
git add bash-cheatsheet.txt
Git does output any message, but you can check that the file has been added
as a new file with the git status command.
git status
On branch main
Changes to be committed:
  (use "git restore --staged <file>..." to unstage)
	new file:   bash-cheatsheet.txt
The file is ready or staged, but to actually take the snapshot of this version, we have to execute one last command:
git commit -m'Added Bash cheatsheet'
[main 7f8cd28] Added B ash cheatsheet
 1 file changed, 2 insertions(+)
We can see that the repository matches the current contents of the directory like so:
git status
On branch main
nothing to commit, working tree clean
The add commit and status commands are the most common and important commands in Git, so
let’s execute this sequence once more below.
nano bash-cheatsheet.txt
Add the new lines below into the bash-cheatsheet.txt file:
Bash cheatsheet
SWC-Workshop

Commands
pwd : path to working dir
cd : change directory
ls : list directory contents
git status
On branch main
Changes not staged for commit:
  (use "git add <file>..." to update what will be committed)
  (use "git restore <file>..." to discard changes in working directory)
	modified:   bash-cheatsheet.txt

no changes added to commit (use "git add" and/or "git commit -a")
Note that Git recognizes the file was changed since the last commit.
We will add and commit these new changes.
git add bash-cheatsheet.txt
git commit -m'Added basic commands'
[main 6441a95] Added email and date
 1 file changed, 3 insertions(+)
And again checking status, Git shows that the repository’s current version
matches the directory contents.
git status
On branch main
nothing to commit, working tree clean
You can see from above that Git insists that we add files to the set we want to commit before actually committing anything. This allows us to commit our changes together and capture changes in logical portions rather than only large batches.
For example, suppose we’re adding a few citations to relevant research to our thesis. We might want to commit those additions, and the corresponding bibliography entries, but -not- commit some of our work drafting the conclusion (which we haven’t finished yet).
To allow for this, Git has a special -staging area- where it keeps track of things that have been added to the current changeset but not yet committed.
Staging Area
If you think of Git as taking snapshots of changes over the life of a project,
git addspecifies -what- will go in a snapshot (putting things in the staging area), andgit committhen -actually takes- the snapshot, and makes a permanent record of it (as a commit). If you don’t have anything staged when you typegit commit, Git will prompt you to usegit commit -aorgit commit --all, which is kind of like gathering -everyone- to take a group photo! However, it’s almost always better to explicitly add things to the staging area, because you might commit changes you forgot you made. (Going back to the group photo simile, you might get an extra with incomplete makeup walking on the stage for the picture because you used-a!) Try to stage things manually, or you might find yourself searching for “how to undo a commit” more than you would like! We’ll show you how to do this a little later in this lesson.

Managing Versions and Tracking Changes
So far, we focused on adding files and changes to a repository. We will reinforce those commands in a similar exercise, but also introduce new git commands to view and manage version history of the repository.
We’ll start by creating a new project related to the plots you created earlier.
cd # cd by itself changes to the home directory
mkdir un-report-readme
cd un-report-readme
pwd
/home/USERNAME/Desktop/un-report-readme
What should git status return on a brand new directory?
git status
fatal: not a git repository (or any of the parent directories): .git
So we initialize the repository:
git init
Initialized empty Git repository in /Users/USERNAME/Desktop/un-report-readme/.git/
Let’s create a file called README.md. We’ll write some notes about
some of the plots we created earlier. We’ll use
nano to edit the file (but you can use whatever text editor you like).
nano README.md
Type the text below into the README.md file:
# UN Report
10/18/2021
Riley.Shor@fake.email.address
And add and commit that new file:
git add README.md
git commit -m'Added README'
git status
[main (root-commit) ac0b28a] Added README
 1 file changed, 4 insertions(+)
 create mode 100644 README.md

On branch main
nothing to commit, working tree clean
For practice, we’ll make a series of changes, adding and committing after each change. For the first change, in your editor, add the summary line shown below.
# UN Report
10/18/2021
Riley.Shor@fake.email.address

Scripts to read and interpret gapminder data.
git add README.md
git commit -m'Added a summary of the project'
[main 4fec7ab] Added a summary of the project
 1 file changed, 1 insertions(+)
One more change: revise the summary line as shown below.
# UN Report
10/18/2021
Riley.Shor@fake.email.address

Scripts to read and interpret gapminder data producing figures that emphasize
the relationship of GDP and life expectancy across countries.
git add README.md
git commit -m'Updated summary with details on figures'
[main a6669c4] Added a summary of the project
 1 file changed, 1 insertions(+), 1 deletions(-)
git status
On branch main
nothing to commit, working tree clean
Every time you commit a change, Git takes a snapshot of the file. You can see
the full list of snapshots with git log.
git log
commit a6669c4fc2a598677a660ce5b831b1e2c9445a96 (HEAD -> main)
Author: Riley Shor <Riley.Shor@fake.email.address>
Date:   Sun Oct 17 10:00:06 2021 -0400

    Updated summary with details on figures

commit 4fec7ab0937addcdebf41962f797bcd92fd1295b
Author: Riley Shor <Riley.Shor@fake.email.address>
Date:   Sun Oct 17 09:59:16 2021 -0400

    Added a summary of the project

commit ac0b28aa38d617eada4a87f383cb7abc51a5faaa
Author: Riley Shor <Riley.Shor@fake.email.address>
Date:   Sun Oct 17 09:58:38 2021 -0400

    Added README
git log lists all commits made to a repository in reverse chronological order.
The listing for each commit includes:
- the commit’s full identifier (which starts with the same characters as
the short identifier printed by the
git commitcommand earlier), - the commit’s author,
- when it was created,
- and the commit message
Often times, a shorter log format is just as useful and easier to read. The
--oneline flag simply shows an abbreviated identifier and the commit comment.
git log --oneline
a6669c4 (HEAD -> main) Updated summary with details on figures
4fec7ab Added a summary of the project
ac0b28a Added README
Each Git commit tracks the content and circumstances of all the changes. You
can see more info on a specific commit with git show followed by one of the
commit identifiers from log command above:
git show 4fec7ab0937addcdebf41962f797bcd92fd1295b
commit 4fec7ab0937addcdebf41962f797bcd92fd1295b
Author: Riley Shor <Riley.Shor@fake.email.address>
Date:   Sun Oct 17 09:59:16 2021 -0400

    Added a summary of the project

diff --git a/README.md b/README.md
index 5a6bf77..03d7655 100644
--- a/README.md
+++ b/README.md
@@ -2,3 +2,4 @@
 10/18/2021
 Riley.Shor@fake.email.address

+Scripts to read and interpret gapminder data.
git show outputs the info from log followed by the differences between the
specified commit and the preceding version. It’s a lot of information, so
we’ll break it down into pieces:
- The first line tells us that Git is producing output similar to the Unix
diffcommand comparing the old and new versions of the file. - The second line tells exactly which versions of the file
Git is comparing;
5a6bf77and03d7655are unique computer-generated labels for those versions. - The third and fourth lines once again show the name of the file being changed.
- The remaining lines are the most interesting, they show us the actual differences
and the lines on which they occur. In particular, it starts with a few
lines in common to give you some context (“10/18/2021” and
“Riley.Shor@fake.email.address”); the final lines show a line was added
to the new version (
+).
Git commit identifiers
Git needs a long commit identifier to ensure all identifiers are unique. That said, most git operations that use a commit identifier can use a shorter identifier provided it’s unambiguous for that repository’s list of existing commits. It is common to use only the first few characters (~7 characters) when specifying a identifier.
Also, we will continue to use the term “commit identifier”, but identifiers are sometimes referred to as “commit index”, “commit hash”, or “commit SHA” (sounds like “shah”).
This command shows the latest commit using an abbreviated commit identifier:
git show a6669c4
commit a6669c4fc2a598677a660ce5b831b1e2c9445a96 (HEAD -> main)
Author: Riley Shor <Riley.Shor@fake.email.address>
Date:   Sun Oct 17 10:00:06 2021 -0400

    Updated summary with details on figures

diff --git a/README.md b/README.md
index 03d7655..71663b6 100644
--- a/README.md
+++ b/README.md
@@ -2,4 +2,5 @@
 10/18/2021
 Riley.Shor@fake.email.address

-Scripts to read and interpret gapminder data.
+Scripts to read and interpret gapminder data producing figures that emphasize
+the relationship of GDP and life expectancy across countries.
As detailed in the comment above, the trailing output shows the actual change from the previous version of README.md.
10/18/2021
Riley.Shor@fake.email.address
Then it shows that one line was deleted from the previous version and two lines were added to new version.
-Scripts to read and interpret gapminder data.
+Scripts to read and interpret gapminder data producing figures that emphasize
+the relationship of GDP and life expectancy across countries.
In addition to comparing versions already committed, you can also compare
in-progress changes to previous commits using git diff. To see this in action,
add the following 4 trailing lines to README.md (starting with “Files/dirs:”).
# UN Report
10/18/2021
Riley.Shor@fake.email.address

Scripts to read and interpret gapminder data producing figures that emphasize
the relationship of GDP and life expectancy across countries.

Files/dirs:
code : R scripts
data : gapminder text data
figures : plots
Check that there is a difference between the working dir and the last repo:
git status
On branch main
Changes not staged for commit:
  (use "git add <file>..." to update what will be committed)
  (use "git restore <file>..." to discard changes in working directory)
	modified:   README.md

no changes added to commit (use "git add" and/or "git commit -a")
See the actual differences between the working dir of the file and the last
commit with git diff:
git diff README.md
diff --git a/README.md b/README.md
index 71663b6..a5a8954 100644
--- a/README.md
+++ b/README.md
@@ -4,3 +4,8 @@ Riley.Shor@fake.email.address

 Scripts to read and interpret gapminder data producing figures that emphasize
 the relationship of GDP and life expectancy across countries.
+
+Files/dirs:
+code : R scripts
+data : gapminder text data
+figures : plots
Sometimes you realize you want to undo a change after you have added the file.
git restore accomplishes this. To illustrate this pattern, we’ll add this
change to the staging area:
git add README.md
git status
On branch main
Changes to be committed:
  (use "git restore --staged <file>..." to unstage)
	modified:   README.md
The git restore --staged command “unstages” the change, keeping the changes in
the working file.
git restore --staged README.md
cat README.md
# UN Report
10/18/2021
Riley.Shor@fake.email.address

Scripts to read and interpret gapminder data producing figures that emphasize
the relationship of GDP and life expectancy across countries.

Files/dirs:
code : R scripts
data : gapminder text data
figures : plots
git status
On branch main
Changes not staged for commit:
  (use "git add <file>..." to update what will be committed)
  (use "git restore <file>..." to discard changes in working directory)
	modified:   README.md

no changes added to commit (use "git add" and/or "git commit -a")
You can use git restore --staged to abandon the working changes and replace with the
version from the last commit:
git restore --staged README.md
git status
At times, it might make sense to abandon the changes in the working dir and replace with the last commit.
git restore README.md
git status
On branch main
nothing to commit, working tree clean
Consider the git restore command in the context of the earlier diagram:
git checkout allows you to peek at an earlier version of the project without
making any changes. Before you do this, verify you have no outstanding
modifications. Use some combination of restore or add and commit so that
you have a clean working tree.
git status
git log --oneline
On branch main
nothing to commit, working tree clean
a6669c4 (HEAD -> main) Updated summary with details on figures
4fec7ab Added a summary of the project
ac0b28a Added README
Checkout the initial commit (will be the last in your list).
git checkout ac0b28a
Note: switching to 'ac0b28a'.

You are in 'detached HEAD' state. You can look around, make experimental
changes and commit them, and you can discard any commits you make in this
state without impacting any branches by switching back to a branch.

If you want to create a new branch to retain commits you create, you may
do so (now or later) by using -c with the switch command. Example:

  git switch -c <new-branch-name>

Or undo this operation with:

  git switch -

Turn off this advice by setting config variable advice.detachedHead to false

HEAD is now at ac0b28a Added README
The “detached HEAD” is like “look, but don’t touch” here, so you shouldn’t make any changes in this state.
Git has rewound the clock and dropped you into an earlier version. Note the log shows only the one change and git has replaced your working dir with the earliest version of this file.
git log --oneline
cat README
ac0b28a (HEAD) Added README
# UN Report
10/18/2021
Riley.Shor@fake.email.address
When you are done looking, use git checkout main to return to the latest
version.
git checkout main
git log --oneline
Previous HEAD position was ac0b28a Added README
Switched to branch 'main'
a6669c4 (HEAD -> main) Updated summary with details on figures
4fec7ab Added a summary of the project
ac0b28a Added README
Finally, if you are having second thoughts about a change you have already
commited, you can revert the change. To illustrate this, we will delete
our README.md file, commit the change, and then revert the change.
rm README.md
git status
On branch main
Changes not staged for commit:
  (use "git add/rm <file>..." to update what will be committed)
  (use "git restore <file>..." to discard changes in working directory)
	deleted:    README.md

no changes added to commit (use "git add" and/or "git commit -a")
Note that Git recognizes the file was deleted. We still use
git addto add the change to the staging area.
git add README.md
git status
On branch main
Changes to be committed:
  (use "git restore --staged <file>..." to unstage)
	deleted:    README.md
git commit -m'Deleted README'
[main 24c3a76] Deleted README
 1 file changed, 6 deletions(-)
 delete mode 100644 README.md
(base)
The file is not in the working directory and the Git log shows the commit that deleted it.
ls
git log --oneline
24c3a76 (HEAD -> main) Deleted README
a6669c4 Updated summary with details on figures
4fec7ab Added a summary of the project
ac0b28a Added README
So now we revert the last commit to rescue that file. This command will launch an editor to allow you to edit a new commit message. You can accept the default message and save/exit the editor.
git revert 24c3a76
[main 4a82b63] Revert "Deleted README"
 1 file changed, 6 insertions(+)
 create mode 100644 README.md
Note that the file was restored to its previous state and Git has added a new commit. This shows that when Git reverts a change, it does not “go back in time” to before the problem commit. Instead it creates a new change that inverts the effect of the problem commit; in our case recreating the file.
git log --oneline
cat README.md
4a82b63 (HEAD -> main) Revert "Deleted README"
24c3a76 Deleted README
a6669c4 Updated summary with details on figures
4fec7ab Added a summary of the project
ac0b28a Added README

# UN Report
10/18/2021
Riley.Shor@fake.email.address

Scripts to read and interpret gapminder data producing figures that emphasize
the relationship of GDP and life expectancy across countries.
Versioning multiple files
Up until now, we have used git with a single file. Git’s real power is that you can use these same commands to version a set of files all at once, enabling coordinated changes that keep all the files in a consistent state. We will explore this by versioning un-report dir we were working in earlier.
cd
cd un-report
pwd
/home/USERNAME/Desktop/cheatsheets
Initialize a new Git repository.
git init
git status
Initialized empty Git repository in /Users/USERNAME/Desktop/un-report/.git/

On branch main

No commits yet

Untracked files:
  (use "git add <file>..." to include in what will be committed)
	.Rproj.user/
	code/
	data/
	figures/
	un-report.Rproj

nothing added to commit but untracked files present (use "git add" to track)
We can add directories in the same we added a single file.
git add code
git status
On branch main

No commits yet

Changes to be committed:
  (use "git rm --cached <file>..." to unstage)
	new file:   code/gdp_population.R

Untracked files:
  (use "git add <file>..." to include in what will be committed)
	.Rproj.user/
	data/
	figures/
	un-report.Rproj
Note that when adding the directory, Git assumes you want to add everything inside that directory. For our purposes that’s correct. Let’s continue by adding the
dataandfiguresdirectories. We can do this in one command:
git add data figures
git status
On branch main

No commits yet

Changes to be committed:
  (use "git rm --cached <file>..." to unstage)
	new file:   code/gdp_population.R
	new file:   data/co2-un-data.csv
	new file:   data/gapminder_1997.csv
	new file:   data/gapminder_data.csv
	new file:   data/rnd-un-data.csv
	new file:   figures/awesome_plot.jpg
	new file:   figures/awesome_violin_plot.jpg

Untracked files:
  (use "git add <file>..." to include in what will be committed)
	.Rproj.user/
	un-report.Rproj
We could keep adding files, but let’s commit what we have now.
git commit -m'Added code, data, figures dirs'
git status
[main (root-commit) 42e0844] Added code, data, figures dirs
 7 files changed, 6404 insertions(+)
 create mode 100644 code/gdp_population.R
 create mode 100644 data/co2-un-data.csv
 create mode 100644 data/gapminder_1997.csv
 create mode 100644 data/gapminder_data.csv
 create mode 100644 data/rnd-un-data.csv
 create mode 100644 figures/awesome_plot.jpg
 create mode 100644 figures/awesome_violin_plot.jpg

 On branch main
 Untracked files:
   (use "git add <file>..." to include in what will be committed)
 	.Rproj.user/
 	un-report.Rproj

 nothing added to commit but untracked files present (use "git add" to track)
One of the reasons Git separates the action of adding files to the staging area
and committing the changes to the repository is that it gives allows you to group
commit into a meaningful, logical, consistent set of changes. It also gives you
the freedom to decide that some files should not be committed to the repository.
Moreover, Git can use a .gitignore file to emphasize to Git that it should
leave certain files in the working directory and never try to add them to the
repository.
Choosing what include in a repository and what to leave out
Some kinds of files belong in a Git repository. Some kinds should never be added to Git. And sometimes it depends on the context and the file. In the UN Report example above, there are files for data, code, figures, and also R-Studio configuration. Which of these do you think would be most appropriate to use for version control? Can you think of examples of files that you might not want to add to Git?
Solution
We will discuss this together in the workshop session.
For now, we will choose to add un-report.Rproj to the repository and ignore
the .Rproj.user/ directory. In your text editor, create a new file named
.gitignore and add the following line:
.Rproj.user/
git status now considers the .gitignore file and correctly ignores that dir
(suppressing it in the output).
git status
On branch main
Untracked files:
  (use "git add <file>..." to include in what will be committed)
	.gitignore
	un-report.Rproj

nothing added to commit but untracked files present (use "git add" to track)
Finally, we’ll commit those last changes.
git add un-report.Rproj .gitignore
git commit -m'Added .gitignore and R-Studio project info'
[main 25147ba] Added .gitignore and R-Studio project info
 2 files changed, 15 insertions(+)
 create mode 100644 .gitignore
 create mode 100644 un-report.Rproj
git status
On branch main
nothing to commit, working tree clean
Consider your commit message
Not all commit messages are created equal. Messages can be too short, too long, redundant, or vague. Indeed some of the commit messages i the examples above may be suboptimal. Consider where the commit messages are used and by whom; discuss some characteristics of an ideal commit message.
Solution
We will discuss this together in the workshop session.
A last thought about directories: Git does not track directories on their own, only the files within them.
   mkdir project_background
   git status
   git add project_background
   git status
Note, our newly created empty directory
analysisdoes not appear in the list of untracked files even if we explicitly add it (viagit add) to our repository. This is the reason why you will sometimes see.gitkeepfiles in otherwise empty directories. Unlike.gitignore, these files are not special and their sole purpose is to populate a directory so that Git adds it to the repository. In fact, you can name such files anything you like.touch project_background/.gitkeep git status git add project_background git status
Git concepts and commands (so far)

- config
- init
- status
- add
- commit
- restore
- log
- diff
- show
- checkout
- revert
- .gitignore
Intro to GitHub
Now that you’ve created a git repo and gotten the hang of the basic git workflow, it’s time to share your repo with the world. Systems like Git allow us to move work between any two repositories. In practice, though, it’s easiest to use one copy as a central hub, and to keep it on the web rather than on someone’s laptop. Most programmers use hosting services like GitHub, Bitbucket or GitLab to hold those master copies.
Let’s start by sharing the changes we’ve made to our current project with the world. We do this by creating a repository on GitHub and linking it to our existing local repository. To link these, GitHub security requires you to use either a Personal Access Token (like a limited-use password) or an SSH key (which establishes a trusted relationship between two systems). Either way works well; we will use the SSH approach detailed below.
SSH Background and Setup
SSH (Secure Shell Protocol) key is commonly used by many different services to authenticate access on the command line. SSH is a cryptographic network protocol that allows secure communication between computers using an otherwise insecure network.
SSH uses what is called a key pair; two keys that work together to validate access. One key is publicly known (the public key), is kept private (the private key).
You can think of the public key as a padlock, and only you have the key (the private key) to open it. You use the public key where you want a secure method of communication, such as your GitHub account. You give this padlock, or public key, to GitHub and say “lock the communications to my account with this so that only computers that have my private key can unlock communications and send git commands as my GitHub account.”
What we will do now is the minimum required to set up the SSH keys and add the public key to a GitHub account.
Advanced SSH
See GitHub SSH for more details on using and configuring SSH.
The first thing we are going to do is check if this has already been done on the computer you’re on. Because generally speaking, this setup only needs to happen once and then you can forget about it.
First we execute this command to check that no SSH key is already set up in GitHub.
ssh -T git@github.com
The first time you do this, you might see the following. When prompted answer “yes”.
The authenticity of host 'github.com (192.30.255.112)' can't be established.
RSA key fingerprint is SHA256:nThbg6kXUpJWGl7E1IGOCspRomTxdCARLviKw6E5SY8.
This key is not known by any other names
Are you sure you want to continue connecting (yes/no/[fingerprint])? y
Please type 'yes', 'no' or the fingerprint: yes
Warning: Permanently added 'github.com' (RSA) to the list of known hosts.
The next line could one of the following outputs below.
Hi Riley! You've successfully authenticated, but GitHub does not provide shell access.
If you see this, then you SSH access is already set up, so you can proceed to Making a repository on GitHub and linking it to a local repository
git@github.com: Permission denied (publickey).
If you see this, it’s ok; keep going below to set up SSH access.
Keeping your keys secure
You shouldn’t really forget about your SSH keys, since they keep your account secure. It’s good practice to audit your secure shell keys every so often. Especially if you are using multiple computers to access your account.
We will run the list command to check what key pairs already exist on your computer.
ls -al ~/.ssh
Your output is going to look a little different depending on whether or not SSH has ever been set up on the computer you are using.
Riley has not set up SSH on her computer, so her output is
ls: cannot access '/c/Users/Riley/.ssh': No such file or directory
If SSH has been set up on the computer you’re using, the public and private key pairs will be listed. The file names are either id_ed25519/id_ed25519.pub or id_rsa/id_rsa.pub depending on how the key pairs were set up.
Since they don’t exist on Riley’s computer, she uses this command to create them:
ssh-keygen -t ed25519 -C "Riley.Shor@fake.email.address"
If you are using a legacy system that doesn’t support the Ed25519 algorithm, use:
ssh-keygen -t rsa -b 4096 -C "Riley.Shor@fake.email.address"
Generating public/private ed25519 key pair.
Enter file in which to save the key (/c/Users/Riley/.ssh/id_ed25519):
We want to use the default file, so just press Enter.
Created directory '/c/Users/Riley/.ssh'.
Enter passphrase (empty for no passphrase):
Now, it is prompting Riley for a passphrase. Since she is using her lab’s laptop that other people sometimes have access to, she wants to create a passphrase. Be sure to use something memorable or save your passphrase somewhere, as there is no “reset my password” option.
Enter same passphrase again:
After entering the same passphrase a second time, we receive the confirmation
Your identification has been saved in /c/Users/Riley/.ssh/id_ed25519
Your public key has been saved in /c/Users/Riley/.ssh/id_ed25519.pub
The key fingerprint is:
SHA256:SMSPIStNyA00KPxuYu94KpZgRAYjgt9g4BA4kFy3g1o Riley.Shor@fake.email.address
The key's randomart image is:
+--[ED25519 256]--+
|^B== o.          |
|%-=.-.+          |
|+=.E =.+         |
| .=.+.o..        |
|....  . S        |
|.+ o             |
|+ =              |
|.o.o             |
|oo+.             |
+----[SHA256]-----+
The “identification” is actually the private key. You should never share it. The public key is appropriately named. The “key fingerprint” is a shorter version of a public key.
Now that we have generated the SSH keys, we will find the SSH files when we check.
ls -al ~/.ssh
drwxr-xr-x 1 Riley Shor 197121   0 Jul 16 14:48 ./
drwxr-xr-x 1 Riley Shor 197121   0 Jul 16 14:48 ../
-rw-r--r-- 1 Riley Shor 197121 419 Jul 16 14:48 id_ed25519
-rw-r--r-- 1 Riley Shor 197121 106 Jul 16 14:48 id_ed25519.pub
Now we that we have a public and private key pair, we need to give GitHub our public key.
First, we need to copy the public key. Be sure to include the .pub at the end, otherwise you’re looking at the private key.
cat ~/.ssh/id_ed25519.pub
ssh-ed25519 AAAAC3NzaC1lZDI1NTE5AAAAIDmRA3d51X0uu9wXek559gfn6UFNF69yZjChyBIU2qKI Riley.Shor@fake.email.address
Now, going to GitHub.com, click on your profile icon in the top right corner to get the drop-down menu. Click “Settings,” then on the settings page, click “SSH and GPG keys,” on the left side “Account settings” menu. Click the “New SSH key” button on the right side. Now, you can add the title (Riley uses the title “Riley’s Lab Laptop” so she can remember where the original key pair files are located), paste your SSH key into the field, and click the “Add SSH key” to complete the setup.
Now that we’ve set that up, let’s check our authentication again from the command line.
ssh -T git@github.com
Hi Riley! You've successfully authenticated, but GitHub does not provide shell access.
Congratulations: your SSH key is configured correctly. You are ready to begin using GitHub.
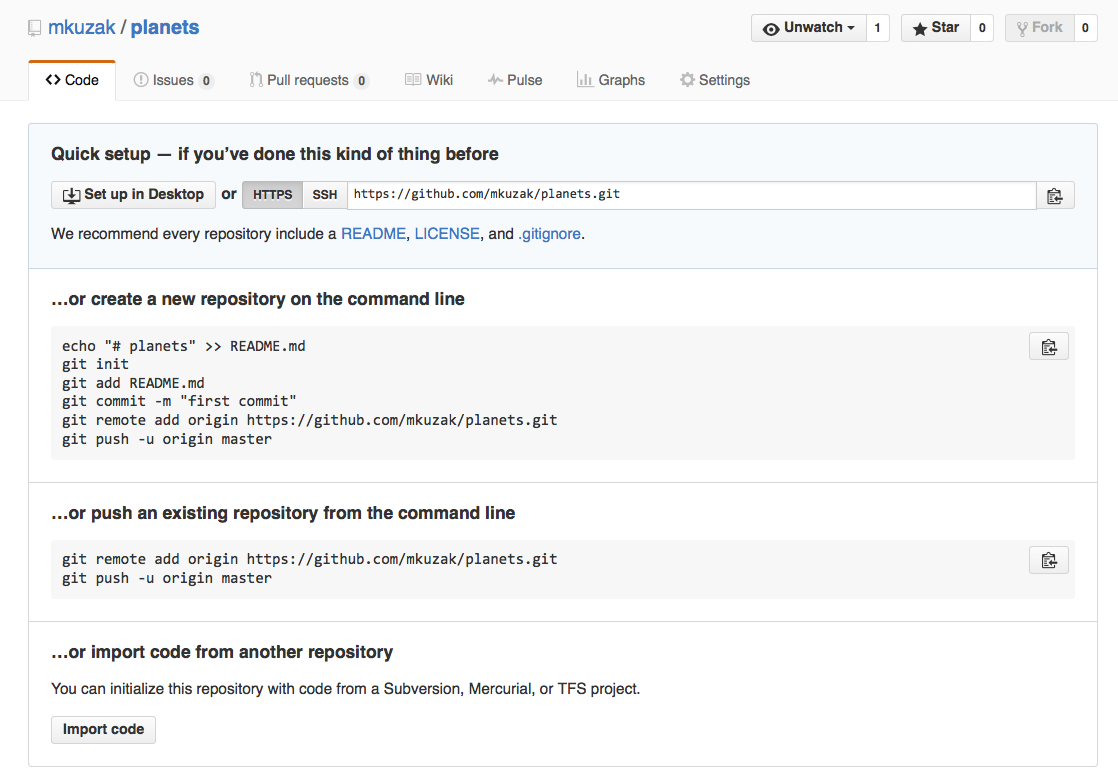
Making a repository on GitHub and linking it to a local repository
Log in to GitHub, then click on the icon in the top right corner to
create a new repository called un-report.
Name your repository un-report and then click Create Repository.
Important options
Since this repository will be connected to a local repository, it needs to be empty. Leave “Initialize this repository with a README” unchecked, and keep “None” as options for both “Add .gitignore” and “Add a license.” See the “GitHub License and README files” exercise below for a full explanation of why the repository needs to be empty.
In the screenshots below, the Owner is ‘mkuzak’ and the Repository name is ‘planets’.
You should instead see your own username for the Owner and you should name the
repository un-report.

As soon as the repository is created, GitHub displays a page with a URL and some
information on how to configure your local repository. Examine the toggle button
labeled HTTPS | SSH; make sure to select the SSH button.
This effectively does the following on GitHub’s servers:
mkdir un-report
cd un-report
git init
If you remember back to the earlier lesson where we added and
committed our earlier work on un-report, we had a diagram of the local repository
which looked like this:
Now that we have two repositories, we need a diagram like this:

Note that our local repository still contains our earlier work on un-report, but the
remote repository on GitHub appears empty as it doesn’t contain any files yet.
The next step is to connect the two repositories. We do this by making the GitHub repository a remote for the local repository. The home page of the repository on GitHub includes the string we need to identify it:

Copy that URL from the browser, go into the local un-report repository, and run
this command:
git remote add origin git@github.com:USERNAME/un-report.git
Make sure to replace USERNAME with your actual GitHub username so it will use
the correct URL for your repository; that should be the only difference.
origin is a local name used to refer to the remote repository. It could be called
anything, but origin is a convention that is often used by default in git
and GitHub, so it’s helpful to stick with this unless there’s a reason not to.
We can check that the command has worked by running git remote -v:
git remote -v
origin   git@github.com:USERNAME/un-report.git (push)
origin   git@github.com:USERNAME/un-report.git (fetch)
Once the remote is set up, this command will push the changes from our local repository to the repository on GitHub:
git push -u origin main
Enumerating objects: 16, done.
Counting objects: 100% (16/16), done.
Delta compression using up to 8 threads.
Compressing objects: 100% (11/11), done.
Writing objects: 100% (16/16), 1.45 KiB | 372.00 KiB/s, done.
Total 16 (delta 2), reused 0 (delta 0)
remote: Resolving deltas: 100% (2/2), done.
To git@github.com:USERNAME/un-report.git
 - [new branch]       main -> main
Our local and remote repositories are now in this state:

The ‘-u’ Flag
You may see a
-uoption used withgit pushin some documentation. This option is synonymous with the--set-upstream-tooption for thegit branchcommand, and is used to associate the current branch with a remote branch so that thegit pullcommand can be used without any arguments. To do this, simply usegit push -u origin mainonce the remote has been set up.
We can pull changes from the remote repository to the local one as well:
git pull origin main
From git@github.com:USERNAME/un-report
 - branch            main     -> FETCH_HEAD
Already up-to-date.
Pulling has no effect in this case because the two repositories are already synchronized. If someone else had pushed some changes to the repository on GitHub, though, this command would download them to our local repository.
GitHub GUI
Browse to your
un-reportrepository on GitHub. Under the Code tab, find and click on the text that says “XX commits” (where “XX” is some number). Hover over, and click on, the three buttons to the right of each commit. What information can you gather/explore from these buttons? How would you get that same information in the shell?Solution
The left-most button (with the picture of a clipboard) copies the full identifier of the commit to the clipboard. In the shell,
git logwill show you the full commit identifier for each commit.When you click on the middle button, you’ll see all of the changes that were made in that particular commit. Green shaded lines indicate additions and red ones removals. In the shell we can do the same thing with
git diff. In particular,git diff ID1..ID2where ID1 and ID2 are commit identifiers (e.g.git diff a3bf1e5..041e637) will show the differences between those two commits.The right-most button lets you view all of the files in the repository at the time of that commit. To do this in the shell, we’d need to checkout the repository at that particular time. We can do this with
git checkout IDwhere ID is the identifier of the commit we want to look at. If we do this, we need to remember to put the repository back to the right state afterwards!
Uploading files directly in GitHub browser
Github also allows you to skip the command line and upload files directly to your repository without having to leave the browser. There are two options. First you can click the “Upload files” button in the toolbar at the top of the file tree. Or, you can drag and drop files from your desktop onto the file tree. You can read more about this on this GitHub page
Push vs. Commit
In this lesson, we introduced the “git push” command. How is “git push” different from “git commit”?
Solution
When we push changes, we’re interacting with a remote repository to update it with the changes we’ve made locally (often this corresponds to sharing the changes we’ve made with others). Commit only updates your local repository.
GitHub License and README files
In this section we learned about creating a remote repository on GitHub, but when you initialized your GitHub repo, you didn’t add a readme or a license file. If you had, what do you think would have happened when you tried to link your local and remote repositories?
Solution
In this case, we’d see a merge conflict due to unrelated histories. When GitHub creates a readme file, it performs a commit in the remote repository. When you try to pull the remote repository to your local repository, Git detects that they have histories that do not share a common origin and refuses to merge.
git pull origin mainwarning: no common commits remote: Enumerating objects: 3, done. remote: Counting objects: 100% (3/3), done. remote: Total 3 (delta 0), reused 0 (delta 0), pack-reused 0 Unpacking objects: 100% (3/3), done. From git@github.com:USERNAME/un-report - branch main -> FETCH_HEAD - [new branch] main -> origin/main fatal: refusing to merge unrelated historiesYou can force git to merge the two repositories with the option
--allow-unrelated-histories. Be careful when you use this option and carefully examine the contents of local and remote repositories before merging.git pull --allow-unrelated-histories origin mainFrom git@github.com:USERNAME/un-report - branch main -> FETCH_HEAD Merge made by the 'recursive' strategy. README.md | 1 + 1 file changed, 1 insertion(+) create mode 100644 README.md
Collaborating with GitHub
For the next step, get into pairs. One person will be the “Owner” and the other will be the “Collaborator”. The goal is that the Collaborator add changes into the Owner’s repository. We will switch roles at the end, so both persons will play Owner and Collaborator.
Practicing By Yourself
If you’re working through this lesson on your own, you can carry on by opening a second terminal window. This window will represent your partner, working on another computer. You won’t need to give anyone access on GitHub, because both ‘partners’ are you.
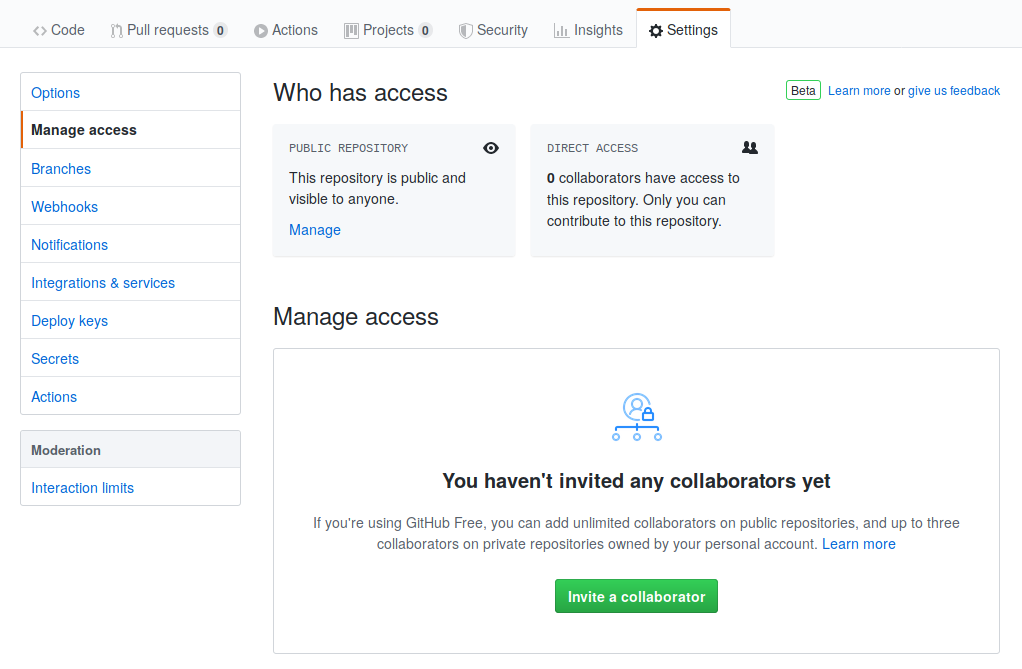
The Owner needs to give the Collaborator access. On GitHub, click the settings button on the right, select Manage access, click Invite a collaborator, and then enter your partner’s username.
To accept access to the Owner’s repo, the Collaborator needs to go to https://github.com/notifications. Once there she can accept access to the Owner’s repo.
Next, the Collaborator needs to download a copy of the Owner’s repository to her
machine. This is called “cloning a repo”. To clone the Owner’s repo into
her Desktop folder, the Collaborator enters:
git clone git@github.com:USERNAME/un-report.git ~/Desktop/USERNAME-un-report
Replace USERNAME with the Owner’s username.
The Collaborator can now make a change in her clone of the Owner’s repository, exactly the same way as we’ve been doing before:
cd ~/Desktop/USERNAME-un-report
nano README.md
cat README.md
You can write anything you like. Now might be a good time to list the –dependencies– of the project – the tools and packages that are needed to run the code.
Dependencies:
- R >= 4.0
- tidyverse
git add README.md
git commit -m "List dependencies"
 1 file changed, 1 insertion(+)
 create mode 100644 README.md
Then push the change to the -Owner’s repository- on GitHub:
git push origin main
Enumerating objects: 4, done.
Counting objects: 4, done.
Delta compression using up to 4 threads.
Compressing objects: 100% (2/2), done.
Writing objects: 100% (3/3), 306 bytes, done.
Total 3 (delta 0), reused 0 (delta 0)
To git@github.com:USERNAME/un-report.git
   9272da5..29aba7c  main -> main
Note that we didn’t have to create a remote called origin: Git uses this
name by default when we clone a repository. (This is why origin was a
sensible choice earlier when we were setting up remotes by hand.)
Take a look at the Owner’s repository on its GitHub website now (you may need to refresh your browser.) You should be able to see the new commit made by the Collaborator.
To download the Collaborator’s changes from GitHub, the Owner now enters:
git pull origin main
remote: Enumerating objects: 4, done.
remote: Counting objects: 100% (4/4), done.
remote: Compressing objects: 100% (2/2), done.
remote: Total 3 (delta 0), reused 3 (delta 0), pack-reused 0
Unpacking objects: 100% (3/3), done.
From git@github.com:USERNAME/un-report
 - branch            main     -> FETCH_HEAD
   9272da5..29aba7c  main     -> origin/main
Updating 9272da5..29aba7c
Fast-forward
 README.md | 1 +
 1 file changed, 1 insertion(+)
 create mode 100644 README.md
Now the three repositories (Owner’s local, Collaborator’s local, and Owner’s on GitHub) are back in sync!
A Basic Collaborative Workflow
In practice, it is good to be sure that you have an updated version of the repository you are collaborating on, so you should
git pullbefore making your changes. The basic collaborative workflow would be:
- update your local repo with
git pull,- make your changes and stage them with
git add,- commit your changes with
git commit -m, and- upload the changes to GitHub with
git pushIt is better to make many commits with smaller changes rather than one commit with massive changes: small commits are easier to read and review.
Switch Roles and Repeat
Switch roles and repeat the whole process.
Review Changes
The Owner pushed commits to the repository without giving any information to the Collaborator. How can the Collaborator find out what has changed on GitHub?
Solution
On GitHub, the Collaborator can go to the repository and click on “commits” to view the most recent commits pushed to the repository.
Comment Changes in GitHub
The Collaborator has some questions about one line change made by the Owner and has some suggestions to propose.
With GitHub, it is possible to comment the diff of a commit. Over the line of code to comment, a blue comment icon appears to open a comment window.
The Collaborator posts comments and suggestions using GitHub interface.
Version History, Backup, and Version Control
Some backup software (e.g. Time Machine on macOS, Google Drive) can keep a history of the versions of your files. They also allow you to recover specific versions. How is this functionality different from version control? What are some of the benefits of using version control, Git and GitHub?
Solution
Automated backup software gives you less control over how often backups are created and it is often difficult to compare changes between backups. However, Git has a steeper learning curve than backup software. Advantages of using Git and GitHub for version control include:
- Great control over which files to include in commits and when to make commits.
- Very popular way to collaborate on code and analysis projects among programmers, data scientists, and researchers.
- Free and open source.
- GitHub allows you to share your project with the world and accept contributions from outside collaborators.
Some more about remotes
In this episode and the previous one, our local repository has had a single “remote”, called
origin. A remote is a copy of the repository that is hosted somewhere else, that we can push to and pull from, and there’s no reason that you have to work with only one. For example, on some large projects you might have your own copy in your own GitHub account (you’d probably call thisorigin) and also the main “upstream” project repository (let’s call thisupstreamfor the sake of examples). You would pull fromupstreamfrom time to time to get the latest updates that other people have committed.Remember that the name you give to a remote only exists locally. It’s an alias that you choose - whether
origin, orupstream, orfred- and not something intrinstic to the remote repository.The
git remotefamily of commands is used to set up and alter the remotes associated with a repository. Here are some of the most useful ones:
git remote -vlists all the remotes that are configured (we already used this in the last episode)git remote add [name] [url]is used to add a new remotegit remote remove [name]removes a remote. Note that it doesn’t affect the remote repository at all - it just removes the link to it from the local repo.git remote set-url [name] [newurl]changes the URL that is associated with the remote. This is useful if it has moved, e.g. to a different GitHub account, or from GitHub to a different hosting service. Or, if we made a typo when adding it!git remote rename [oldname] [newname]changes the local alias by which a remote is known - its name. For example, one could use this to changeupstreamtofred.
Glossary
Key concepts
- .git/ : hidden dir at the top of the project that contains all of gits internals about the repository; you typically don’t interact with the contents of this directory directly but instead use git commands above.
- staging area : the set of changes files that are ready to be committed
- commit: a version of the project; each version will be assigned a unique commit index
- .gitignore: a way to exclude files from the git repo based on their name
- SSH key: establishes a secure trust relationship between two systems (e.g. your laptop and GitHub)
- GitHub: a website that hosts Git repositories for sharing and collaboration.
Key commands:
- commands to interact with local repository:
- config : configure an option (like user.email); can be global or local to a repository.
- init : initialize a dir as a Git repository.
- add : mark a file should be included in the next commit.
- commit : create a new version of the project using the files in the staging area
- status : list the state of the working dir vs staging area vs last commit.
- restore : abandon changes in progress and switch to the last committed version.
- log : show versions (commits) from newest to oldest changes.
- diff: show the differences between one version and another
- show: combines output of log and diff above for a single commit
- checkout: wind the clock back and have a look at an earlier commit
- revert: undo a commit; more precisely add a new commit that inverts the change in a previous commit
- commands to interact with remote repository
- remote : list or add a remote repository
- clone : initialize a local repository based on a remote
- push : move local changes into remote repository
- pull : move remote changes into local repository
Key Points
Version control is like an unlimited ‘undo’.
Version control also allows many people to work in parallel.