Software Management and Conda
UM Bioinformatics Core
In this module, we will:
- learn more about software management
- discuss package managers
- discuss conda as a software management solution
- learn how to set up conda and use it on Great Lakes
- learn how to create and use our own conda environments
Software Management
Software management is something that is not typically appreciated until it is missing. In your typical day-to-day computing tasks, software management is an automatic background process, and generally this is how we want things to be.
When performing research computing tasks, however, you may run into situations when this automatic background handling of software requirements is not sufficient. You may have very specific version requirements, or you may have disparate (or incompatible!) software needs for different tasks.
Package Managers
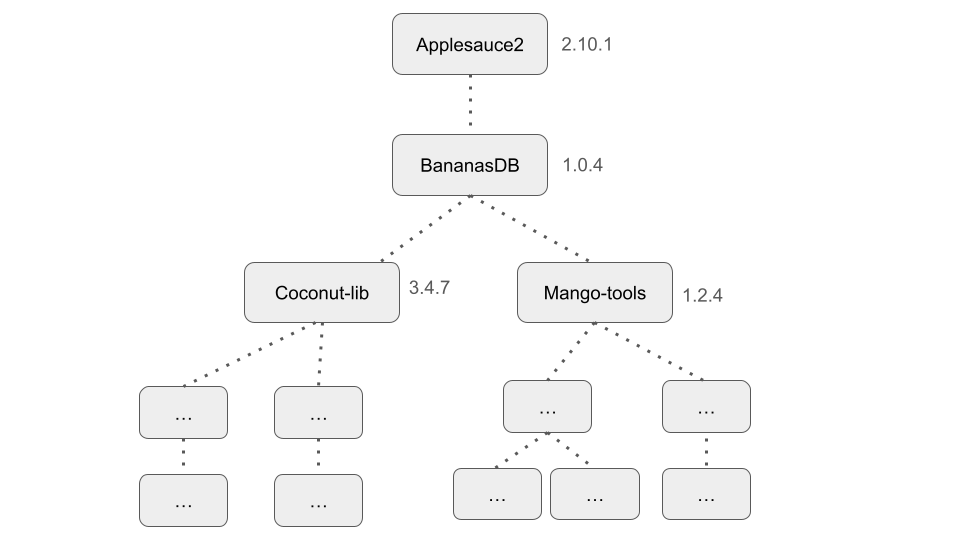
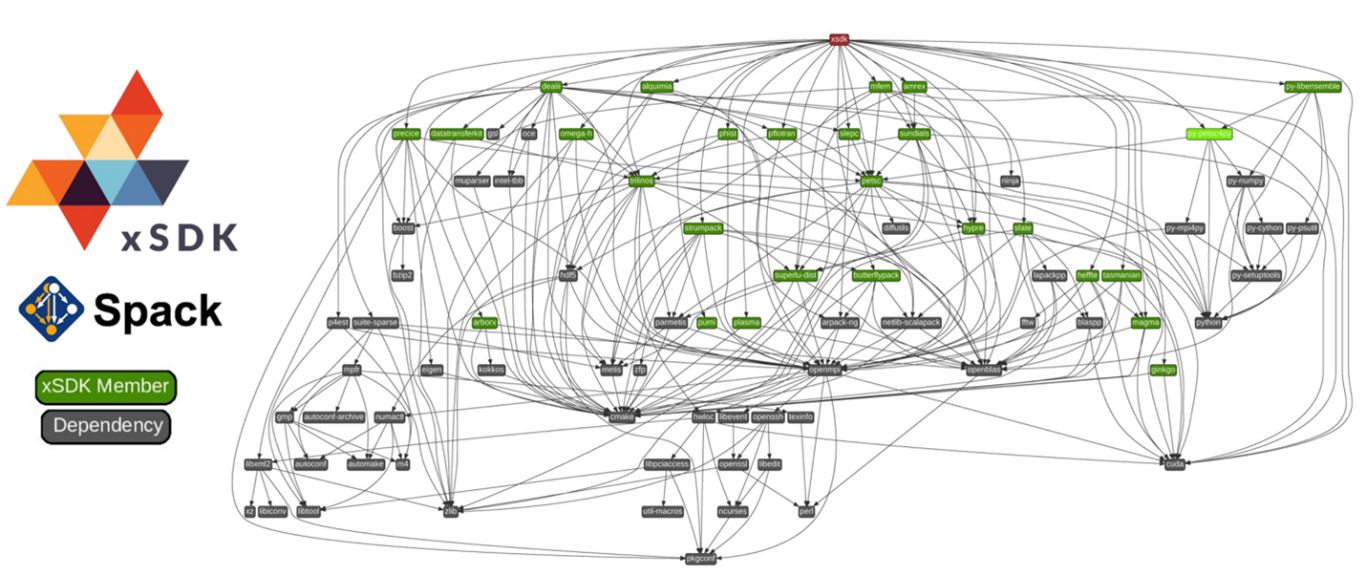
We likely all have some experience with software management. I’d like to examine our experience with software management, and promote appreciation for the work that often happens behind the scenes.
A fictional, simple example of a dependency tree

A tangled mess of a dependency tree, for a real academic software package

The Need for Modular Solutions

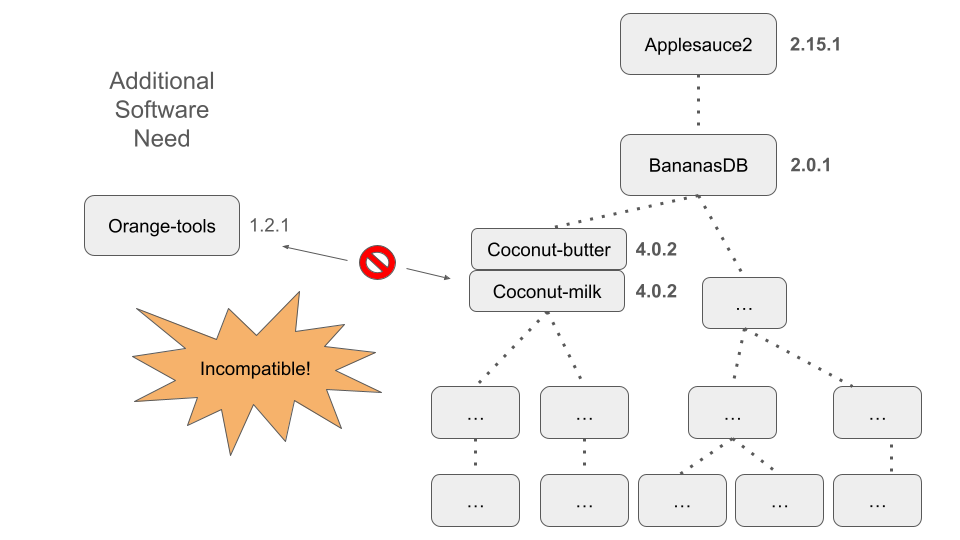
Here we demonstrate another scenario that we might encounter when trying to manage our software, especially as our list of software requirements becomes increasingly lengthy or increasingly bespoke.
In the figure above, we show what could happen when we try to use a cutting-edge version of our fictional software package ‘Applesauce2’ alongside another package ‘Orange-tools’
Conda
- Broad support for many types of software packages
- Across languages and platforms
- Pluggable - Ability to switch between software environments at will
- Automatically handles software requirements
- A ‘Conda recipe’ is used to list specifications
- Used during environment creation
- Can communicate requirements to others when shared
Allows Us to Manage Our Own Software
For us as users of research software, we’re primarily interested in conda because it grants us the ability to manage our own software. In addition, it provides the immense benefit of providing pluggability to our software management capabilities.
Simplifies Distribution of New Software
When we’re dealing with academic software, a lot of times we’re dealing with software is ‘cutting-edge’ - the developers may be pushing the limits of existing software solutions and run into problems. Often, the develompent of cutting-edge software will find these problems in established libraries, and they will be addressed in tandem with the development of the new cutting-edge software that has flushed out these new edge-cases. This means that we’re often relying on very recent versions, or as we alluded to above, very specific versions of various software dependencies.
The platform allows developers to record a project’s environment in a shareable ‘recipe,’ simplifying the replication of software setups. This streamlines collaboration and ensures that software runs consistently across different machines.
For developers, Conda breaks down software distribution into a few straightforward steps. By defining and packaging an application’s environment, they make it effortlessly accessible, thereby encouraging broader use and facilitating user adoption.
Conda Environments
The environment is what is created by Conda, it is the culmination of the dependency solving and installation completion that conda takes care of during the creation stage. After it is created, it will remain available and can be enabled/disabled at will.
To enable and disable an existing conda environment, we will use the
command terms conda activate <environment name> and
conda deactivate.
With the environment activated, software is made available, relevant commands become callable, etc., and when it’s deactivated, the software becomes unavailable again.
Quick aside about $PATH - it is one of the tricks that
conda uses in order to achieve this pluggable capability that we’ve been
talking about. the $PATH environment variable is used to
specify and prioritize software locations. We’ll see this in action
during our exercises below.
A Couple of Quick Notes
- Conda provides pluggable capability, but it does not offer a high degree of isolation from other software on your system.
- We use ‘Conda’ as a generalized term. There are several variations
including ‘Anaconda’ and ‘Miniconda’.
- Anaconda comes pre-bundled with a plethora of common python and data science packages.
- Miniconda starts out as more of a blank slate.
Packages and Channels
We want to get started using Conda fairly quickly and give practical tips for using it in our HPC ecosystem, so we’re not going to cover some of the finer details about how conda creates environments.
We really start to care about these details when we are creating our own conda environments.
There is an excellent online resource here, covering the detailed structure of conda packages and how it works under the hood
Basically, conda packages are bundled up software, system-level libraries, dependency libraries, metadata, etc. into a particular structure. This organized structure allows conda to achieve its package management duties while retaining the beneficial characteristics and capabilities that we enjoy.
Conda Configuration with .condarc Overview
- Condarc file contains configuration details for your conda installation.
- Link to documentation on using condarc
- In our workshop exercises together, we will not create nor modify a
.condarcfile.- Instead, we’ll temporarily set
envs_dirsusing our workshop conda shortcut script. - We will set it to a location within our
$WORKSHOP_HOME.
- Instead, we’ll temporarily set
Example .condarc with envs_dirs set to a turbo
location
envs_dirs:
  - /nfs/turbo/your-turbo-allocation/path/to/conda_envs
Where your-turbo-allocation/path/to/conda_envs is a
directory in your Turbo allocation that you create specifically for
storing your conda environments
Exercise - Quick-Start with Conda
We will use a pre-prepared shortcut to load ARC’s anaconda module and set some configuration details. Following along with the instructor, we’ll inspect what the shortcut does, and discuss how you could take similar steps and modify these configuration details for future work with conda on Great Lakes
source ${WORKSHOP_HOME}/source_me_for_workshop_conda.sh
which python
Exercise - srun, Conda Activate, Run Dialog Parser
Following along with instructor, learners will activate an existing
environment. We’ll demonstrate addition to the $PATH (and using
which). Then, we’ll try running our
dialog_parser.py script.
srun, Conda Activate, Run Dialog Parser - Solution
srun --pty --job-name=${USER}_dialog_parsing --account=bioinf_wkshp_class --partition standard --mem=4000 --cpus-per-task=4 --time=00:10:00 /bin/bash

source ${WORKSHOP_HOME}/source_me_for_workshop_conda.sh

conda activate /nfs/turbo/umms-bioinf-wkshp/shared-envs/dialog_parsing/
which python
cd ${WORKSHOP_HOME}/projects/alcott_dialog_parsing
mkdir results_shared_conda
python scripts/dialog_parser.py -i inputs/alcott_little_women_full.txt -o results_shared_conda -p ADJ -c 'Jo,Meg,Amy,Beth,Laurie'
ls -l results_shared_condaNote: After you complete the exercise, you can end your currently-running
srunjob by typingexit. You can always check if you’re on the login node or a worker node using thehostnamecommand.
Exercise - srun and Conda Create
Following along with instructor, we’ll launch an srun job and then
create a conda environment in it. After it’s created, we’ll test it by
activating and deactivating it. While active, we’ll check things like
$PATH and use which to confirm that it’s
working as intended.
Conda Create - Solution
srun --pty --job-name=${USER}_conda_create --account=bioinf_wkshp_class --partition standard --mem=4000 --cpus-per-task=4 --time=00:20:00 /bin/bash

source ${WORKSHOP_HOME}/source_me_for_workshop_conda.sh

conda config --show envs_dirs

conda create -n my_dialog_parsing -c conda-forge python=3.11 wordcloud spacy=3.5.4 spacy-model-en_core_web_sm=3.5.0

conda activate my_dialog_parsing
which python
Note: After you complete the exercise, you can end your currently-running
srunjob by typingexit.
Exercise - Conda Export
Following along with the instructor, we’ll use Conda’s export functionality to create an export - a more complete recipe with all dependencies and their versions fully listed.
Conda Export - Solution
conda activate my_dialog_parsing
conda env export > ${WORKSHOP_HOME}/conda_envs/export_my_dialog_parsing.yaml
Exercise - srun, Conda, Dialog Parsing and Creating
Word Clouds
Following along with the instructor, we’ll launch an interactive job
with srun. Once we’ve entered the running job, we’ll
activate our conda environment and re-create our results from the
previous Dialog Parsing Exercise. This time, we’ll also take it one step
further by using our word_cloud.py script to create word
clouds from the extracted word lists.
srun, Conda, Dialog Parsing and Creating Word Clouds -
Solution
srun --pty --job-name=${USER}_conda_wordclouds --account=bioinf_wkshp_class --partition standard --mem=4000 --cpus-per-task=4 --time=00:15:00 /bin/bash

source ${WORKSHOP_HOME}/source_me_for_workshop_conda.sh
conda activate my_dialog_parsing

cd ${WORKSHOP_HOME}/projects/alcott_dialog_parsing
mkdir results_my_conda

python scripts/dialog_parser.py -i inputs/alcott_little_women_full.txt -o results_my_conda -p ADJ -c 'Jo,Meg,Amy,Beth,Laurie'
python scripts/word_cloud.py -i results_my_conda/Jo_adj.txt

ls -l results_my_conda
Review
Conda allows us to install and manage our own software. On a multi-user system like Great Lakes, this is very powerful.
Conda is basically a package manager - it is software that manages bundles of other software - but it has additional capabilities that make it great for reproducibility.
It provides pluggability to our software needs. When we need a wide variety of tools at different times, with some being incompatible with one another, this becomes critical.
When given a set of software requirement specifications, Conda
handles all of the dependencies and creates a somewhat contained
environment that we can activate and
deactivate as needed.